Ubuntu Simplefied: Elementary OS
Part III: File Manager
(versi bahasa Indonesia)
(versi bahasa Indonesia)
Congratulations, now that your system is installed you're officially starting to enter the world of Linux! The guide on my previous posts are usable not just for Jupiter, but also other Ubuntu derivatives. Should you need to install Ubuntu and or it's derivatives now you already know how! When this guide composed the current release of Ubuntu is 11.04 (named "Natty Narwhal" or simply called "Natty")

and since Jupiter is based on Ubuntu 10.10 (Maverick) Elementary don't recommended to upgrade your system when the update manager offer you to perform upgrade (as described on above capture), so please don't upgrade to Natty otherwise you'll break your system. However you can install Natty and apply Elementary's themes and tweaks, you also can install Maverick and have Elementary's themes and hacks... like I previously said on my first post: Linux is free to customize! However we're still several step away from that. We'll discuss that later, for now let's learn the first thing you need to know about Jupiter: File Manager. File Manager is a crucial part of any OS because it's what you use to manage your files and navigate your system. Just like Ubuntu, by default Jupiter is using GNOME for it's desktop environment and Nautilus is GNOME's default File Manager. In Jupiter Nautilus is modified with several enhancement and it's called Nautilus Elementary (let's just call it "Nautilus" to keep it short).

Click Places > Home Folder to open Nautilus

and this is the default view of Nautilus showing folders and files in your home folder.

but I prefer to customize it like what you see on the above picture.
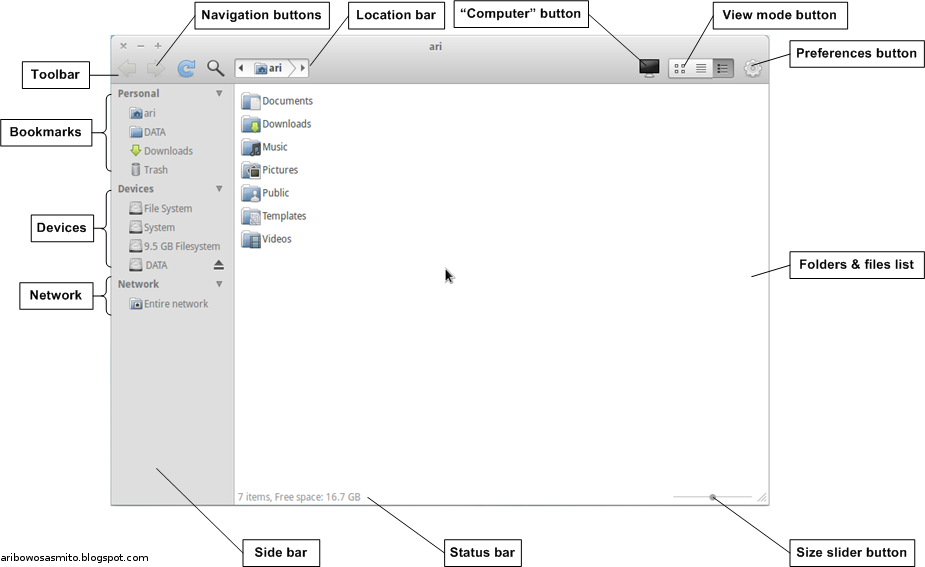
I'll explain the comments in clockwise order:
- Navigation buttons: this is where you can go back, forward and reload (refresh) when you navigate your system.
- Location bar: show you your current position, you can also use this bar to go back and forward.

- "Computer" button: takes you to "Computer", you'll see storage devices connected to your system by viewing in "device: volume" style (a volume is equal to a partition).
- View mode button: to select between Icons, List, or Compact view.
- Preferences button: to open the preferences menu.
- Folders and files list: self explanatory.
- Size slider button: slider button to enlarge or shrink the view of folders and files.
- Status bar: self explanatory.
- Side bar: a bar that holds various locations that you can navigate.


- Network: this is where your network locations grouped, you can connect to a network location by going to Places > Connect to Server... and define the necessary parameters such as service type, hostname or IP address, username, password, port, etc.
- Devices: list of volumes in your system. If you notice the arrow on the right side of the volume called "DATA" that's the unmount or eject button, in Windows you know this as "safely remove" or equal to ejecting a device for ejectable devices such as optical drives.
- Bookmarks: in Jupiter it's renamed to "Personal", this is where you can place your favorites for quick access. There's one special folder that can't be removed called "Trash", in Windows you know this as "Recycle Bin". Click "Trash" to view it's contents and click "Empty Trash" button to empty your trash, or if you're sure there's nothing important in your trash you can directly right click and click "Empty Trash"


You can add a location by drag-and-drop a folder on the list to the bookmarks

or remove it by right click and click remove, or press delete key.
- Toolbar: self explanatory.
Customizing Nautilus

Right click on any empty area on the toolbar, usually next the location bar, and click "Customize Toolbar..."

"Customize Toolbar" menu will appear, click the right arrow to add toolbar items or the left arrow to remove the items. Drag-and-drop the items to reorder the items sequence.

To configure more aspects of Nautilus click on "Preferences" icon, "File Management Preferences" menu will pops up.


On the above picture you see Views, Behavior, Display, List Columns, Preview, Media, and Tweaks tabs. Views tab: the default view mode of Nautilus, unless you've change the view of a folder using the view mode buttons (Nautilus remembers folder's last view mode) this is the default view of how Nautilus will display folders and files. As I've previously mentioned you'll have the choice to view in Icon View, List View or Compact View.

Behavior tab: select "View executable text files when they are opened" unless you don't mind Nautilus keep asking you what to do every time you click a text files.


Preview tab: Nautilus have the ability to preview files when it's in "Icons" view mode, you'll have the options to either always preview the files (including files located over the network), local files only, or never. I choose "Never" to speed up my system.


Media tab: how Nautilus handle media or devices connected to the system. Nautilus can ask you what to do, do nothing or open folder (browse) the media. You can configure Nautilus to handle the media using application associated with the media type, for example it you insert an Audio CD Nautilus can automatically open VLC media player. You can also choose to disable the automation of media handling by enabling "Never prompt or start programs on media insertion" and disable automatic media browsing, unless you don't mind new Nautilus window pops up every time you insert a media. This can be unpleasant if you insert a media with multiple volumes, each volume will open a Nautilus window, but then again it's your call.

Tweaks tab: this is where you can do several tweaks on Nautilus.
Again, settings above are the way how I set my Nautilus. Feel free to change them to suit you needs.
Connecting and Disconnecting Disks

What you see above is the view of my Nautilus viewing "Computer" in icon view mode which shows devices connected to my system with it's volume whether it's mounted or not. Inside the sidebar in devices group you'll see devices currently mounted, as I previously mentioned the up arrow icon is for unmount or eject the disks before you unplug them. This is mandatory, data loss may occur if a writeable media (such as flash disk and external HDD) isn't unmounted before you unplug them. For a volume with label (or name) on it Nautilus will display it, but if it's unnamed Nautilus will display the volume size.

To view the detail of folder(s) and or file(s) select the items, right click, and then click "Properties". You can use shift or control key if you need to select multiple items, and here's some examples:

Detail of 2 files

Detail of 1 file

Detail of a folder, you'll also see the remaining space of the volume

Detail of a volume
No comments:
Post a Comment