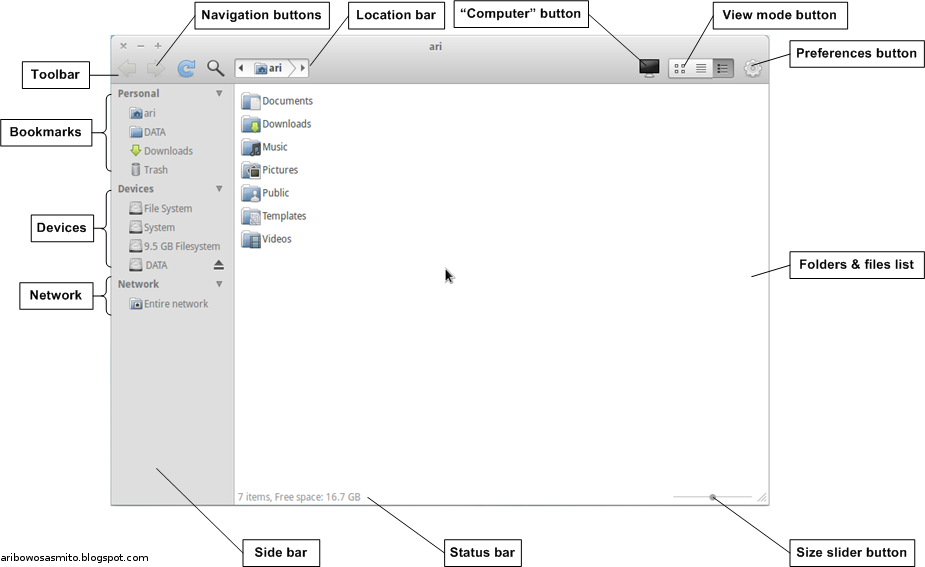
Desktop, NetworkManager and Package Management
As I've mentioned on my previous posts, Linux comes with several GUI. Ubuntu's default GUI is using GNOME with it's default view using two panels in the screen (on the top and bottom), this layout has been around for quite a while. Ubuntu Natty introduce a new interface called "Unity"


which you can observe on the above picture.

Alternatively you can change your desktop to look like above picture using GNOME 3, the latest version of GNOME. As for Jupiter the default view is using a panel on the top and a dock on the bottom
like what you see on above picture. You can change it if you want, but since we're learning the interface from the basic we're still several step away from that.
Unlocking
By default Jupiter comes with it's panel and dock in locked state, but this guide provide the way to open the lock so we can learn and do some tweaks.
Above picture is an example of what you get when you right-click the panel,

and when you right-click the dock (it's using Docky) you'll only have the option to open the icon which will open the program. To open the lock press alt and F2 button on the keyboard, a "Run Application" dialog will appear

type "gconf-editor" (exclude the " character, looks just like above picture) and click "Run" button when you're done.

GNOME configuration editor will appear, as displayed on above picture go to /apps/panel/global on the left tree pane and click on the "locked_down" value to remove the check mark. Close the editor when you're done, right-click on the panel
and you'll have like what you see on above picture, full control on panel's configuration!
Right-click the panel and then click to view it's properties,

on the "General" panel properties tab these are what you'll be able to configure:
- Orientation: panel's location on the screen, you can put it on the top, bottom, left or right.
- Size: configure panel's size.
- Expand: you can either let the panel to stretch or dynamically grow (and or shrink) following the number of applets you add or remove.
- Autohide: the panel will automatically hide when it's not in use, move the mouse over to see it again.
- Show hide buttons: buttons to manually hide the panel.

And on the "Background" panel properties tab you can configure the panel's appearance, the options are:
- None: use system theme color, the panel will use color defined by the system theme.
- Solid color: choose the color you desire to use, you can also configure the panel to appear transparent. Use the slider button to configure the transparency level.
- Background image: use an image file.
As for the locked dock, this is how you open the lock:

open the configuration editor, you already know how, go to /apps/docky-2/Docky/Items/DockyItem and click on the "ShowDockyItem" value. Close the configuration editor,

and you'll have Docky's setting icon which will always stay on the first (left to right direction) among other icons.

Click the settings icon, and you can configure Docky using "Docky Settings" menu. It's quite self explanatory so I won't talk much about it, besides I prefer and recommend to use AWN (Avant Window Navigator) because AWN has more features.

Last but not least... to add more launcher the simplest way is to open the program, right click the dock and then click "Pin to Dock" like shown on above picture. Removing the launcher is also simple, just right-click and then click remove. Make sure the program is not running, otherwise the right-click menu will give you different options.
Customizing Desktop

Picture on the above show you an already customized desktop, "Docky" already replaced with "AWN". I'll explain the comments on the panel from left to right direction, to make it easier I've added separators (a vertical white line) between applets on the panel.
(1) Menu Bar: menu bar applet. This is where you can access installed applications, go to places, and configure system preferences and administration.
(2) Globalmenu Applet: an applet that shows a global menu. Global menu is a Mac OS style menu, a menu that will dynamically change depends on the program you currently use. Instead of using the well known style - title bar on the top following with menu bar, tool bar, etc. - global menu will display the active program using "Program Name Program Menu" style, on the above picture you see "File Manager File Edit View Go Bookmarks Help" because the active program is File Manager.

As I previously mentioned the global menu will dynamically change, on the above picture you'll notice the menu changed to "GIMP Image Editor File Edit Select View Image Layer Colors Tools Filters Windows Help" because the active program is GIMP, the program that I use to make screenshots for this guide. For supported programs - programs written using GTK (because GNOME is also written using GTK) - the menu will dinamically change,

but if the program is unsupported global menu will only display the program name. You'll find global menu's advantage on system using small screen, netbooks for example. Ubuntu takes this approach even further in Natty, you'll only see "Program Name" on the panel, the menu will appear when you move your mouse over.
(3) System Monitor: a system monitor applet.
(4) CPU Frequency: CPU frequency applet. This applet will display the current CPU frequency, you can manually change it by click it - for example when you need to conserve your battery you can use "Powersave"
(5) Notification Area: notification area applet. In Windows you know this as "System Tray", this applet will place icons for programs that need display it's icon in notification area.
(6) Indicator Applet: this applet will display something that needs your attention on the desktop.
(7) Clock: clock applet. Self explanatory.
(8 Weather Report: weather report applet. Self explanatory, don't forget to set your current location to display the current weather in your area.
In short, a panel is a bar that you can fill with various applets which I've explained above.
To remove an applet right click on the applet and click "Remove From Panel", you'll also have other options (depends on the applet) - for example to view the applet's help, to move the panel, to lock the applet to panel. Removing an applet is not merely because you don't need it, in certain situation (for example when the panel is full or when you can't move an applet) sometime it's necessary to remove it and then add it again.
To add an applet right-click on an empty area of the panel, if the panel is full then you can delete an applet and add it again like what I just explain above, and then click "Add to Panel"

scroll down to select an applet or type a keyword to find it. Click "Add" button to add the applet, add another applet if you wish, click "Close" when you're done.
Done with the panel, let's continue to AWN.
(1) Separator: a separator line to divide applets, for example I've configure my AWN to divide the Launcher/Taskmanager applet on the left side of the separator with other applets on the right side of the separator. The Launcher/Taskmanager applet is an applet that act both as launcher for storing shortcuts and task switcher to select running applications which means AWN will launch the program when you click an icon
but if the program is already running - marked with arrow(s) - when you click the icon it will give you a popup of what you can choose to do with the application (if more than one window opened AWN will tell you)
and a right-click will give you more options.
(2) Volume Control Applets: self explanatory
(3) Hardware Sensors Applet: an applet that display information acquired from hardware sensors of your system
(4) Garbage Applet: a Recycle/Trash applet.

To configure AWN right click on any area of the dock and click "Dock Preferences"

which will display AWN Settings menu. It's quite self explanatory so I'll let you find out about it yourself.

And for the applets, click the "Applets" and then choose "Available Applets" on the right pane. To make things easier you can also search the applets using categories on the left pane. Click an applet you wish to add to the dock, and then click the down arrow. To remove an applet click on the applets located on the "Active Applets" pane on the bottom, and then click the up arrow.
Let's move on the the next step: NetworkManager
NetworkManager
Among other GNOME's utilities, I say NetworkManager is one of the best and most important because since NetworkManager arrive networking in Linux has become so easy! Find the NetworkManager applet (the up and down arrow icon) in the notification area
and you'll see a menu similar like the above picture.

Turn on your wireless switch and click again, you'll see wireless networks within reachable range.
If your switch is on and you can't see any wireless networks click the NetworkManager icon, make sure the "Enable Wireless" is checked. Note: to completely disable networking (both wired and wireless) you can click on the "Enable Networking", no check mark means your networking is off.
If you still don't see any wireless networks this is what you need to do: go to Applications > Accessories, open "Terminal". Type "sudo -s" (exclude the " character) to gain administrative privilege, input your password, and then type "rfkill unblock all" to enable all wireless communication. This will also turn on Bluetooth (if you have any). The username@hostname in your terminal will appear different, depends on how you configure it. And there you go our first lesson on Linux commands, we'll discuss more about it later.
To edit network connections right-click on the NetworkManager applet and click "Edit Connections"

NetworkManager menu will appear, usually a profile named "Auto eth0" already created but since I've changed mine there are 2 profile named "Static" and "Automatic". To add a new connection click the "Add" button, to edit an existing connection click on the profile name and click edit or yo can simply double-click the profile name.

Above picture show editing menu on "Automatic" connection profile,

and since it's automatic there's no need to change anything. If you notice the check mark on "Connect automatically" it means every time the adapter becomes active (cable plugged in for wired or network in range for wireless) the profile will automatically activated, while "Available to all users" means every users on the system are allowed to use this profile.

If your network is using static IP address you need to create another profile, in this example I named mine "Static" but you're free to name yours whatever you want. Choose "Manual" on connection method, click "Add" and input the IP address parameters. Consult with your network administrator for this values, don't forget to remove the "Connect automatically" or NetworkManager will confuse if you configure more than one profile to automatically start whenever a connection becomes active. For wireless networks the easiest way is to enable the wireless and click on the network, a profile named "Auto SSID" will automatically created - for example if the network named "WiFi" the profile will have "Auto WiFi" for it's name. You can edit the profile name, for a manual way of connecting you can configure NetworkManager to not automatically connect whenever the network is in range by removing the check mark on "Connect automatically".
Package Management
As described in the wiki Linux Package Management is a collection of software tools to automate the process of installing, upgrading, configuring, and removing software packages (software packaged in an archive format which contains a specific application or service) for an Operating System in a consistent manner. Back in the old days due to dependencies managing program was complicated, this application depends on other applications and or libraries while these other applications and or libraries also depends on another applications and or libraries, which in the end will force you to deal with complications. With Ubuntu it's a different story, package management will handle the complications. Click here if you want to know more about Ubuntu's package management. Like Debian, the distribution which Ubuntu is based on, Jupiter is using apt with Synaptic for it's front-end. Indeed there's "Ubuntu Software Center" but i recommend Synaptic over Ubuntu Software Center because Synaptic offers several advantages, one of them is: it shows more information/progress status when it's working on your requests so you have a good knowledge of what Synaptic currently doing.

Connect to the internet, we've discuss it before so you should know how. Click System > Administration > Synaptic Package Manager

type your password and hit enter or click "OK" to continue

and welcome to Synaptic Package Manager! As you can see on the above picture there are 3 pane, first pane on the left is a list pane with ability to group packages to categories. You can use the Sections, Status, Origin, Custom Filters, and Search Results buttons to browse and work with Synaptic. Second pane on the top right list packages along with it's information. Third pane on the bottom right holds detail information about a package you select.

First thing to do before using managing packages is updating Synaptic's Repositories. Click Settings > Repositories to configure Synaptic's software sources configuration

and enable the "Canonical Partners" to gain access to third party software, software offered by partners of Canonical (the company that develop Ubuntu) which provide proprietary and closed-source not enabled by default. Click "Close" when you're done, click "Reload",

and then wait for package information download to finish.

Type "awn" (exclude the " character) in the Quick search input, find "avant-window-navigator" in the packages list pane, right-click and then click "Mark for Installation". Since I've already install AWN the picture above looks different. Accept any pop-ups asking about dependencies, you also need to install "awn-applets-common" for AWN's applets.

Click "Apply", wait for Synaptic to finish downloading and installing. Quit "Docky" to prevent more than 1 dock running simultaneously, it can be uncomfortable,

and then start AWN by clicking Applications > Accessories > Avant Window Navigator. You also need to install the Globalmenu, since Globalmenu is not officially provided by Canonical you need to add Globalmenu's PPA. Copy below line to Synaptic's software software sources:
deb http://ppa.launchpad.net/globalmenu-team/ppa/ubuntu lucid main
and don't forget to reload. When the installation done you need to logout, add Globalmenu's applet to the panel, and then logout twice. We're done with AWN and desktop customizations, as I previously mentioned this is just a guide to describe a way of customizing your desktop. You can stay with Jupiter's default appearance, you can leave Docky to run since the AWN installation is an example of how to use Synaptic, you can quit Docky and not install AWN and go back to default GNOME appearance by adding more panel or simply adding the task manager applet to the panel, the choice is yours!
Preferences
Like "Control Panel" in Windows or "System Preferences" in Mac OS, GNOME also provide "Preferences". Let's discuss some essential settings... first thing you need to know is how to disable Docky to automatically load on startup,

go to System > Preferences and then click "Startup Applications"

locate "Docky" and remove the check mark. Go back to AWN, open it's settings, and enable the "Start AWN automatically" option. To configure Appearance select "Appearance" in Preferences menu,

and then choose the aspect you wish to configure, for example on the above picture is preference of the background (wallpaper) of the system. To configure the keyboard shortcut select "Keyboard Shortcuts" in the preferences menu,

you can modify the predefined shortcuts or create a new shortcut. The last essential setting is Power Management Preferences,

make sure you get what you want when you close your notebook lid.
In case if you're wondering the difference between "System Preferences" and "System Administration", System Preferences is per-user settings which means what you configure in System Preferences will only affect the current user while System Administration provide you tools that will affect your system globally (meaning all user in the system).
Next: Programs and Tools