Ubuntu Simplefied: Elementary OS
Part II: Installing
In my previous post we've learned how to prepare and create Elementary's installable live USB and you've seen the interface, which is simple: a panel on the top, a dock on the bottom, and a clean desktop between them. You're already using Linux when you've seen that interface on your computer, but as I previously mentioned: it's a live system! A live system have several advantages, one of them would be: you can plug it on any computer and you're ready to go, but a live system is a non-installed system. In this second part of my Elementary OS guide we'll learn how to install Jupiter to your system. But first, let's learn about disk partitioning. This is mandatory since we're going to install Jupiter on a disk that already stored another OS and (most likely) your data.
Disk partitioning, as described in it's wiki, is the act of dividing a Hard Disk Drive (HDD) into multiple logical storage units referred to as partitions, to treat one physical disk drive as if it were multiple disks. Below image will give you an easier way to understand (as usual, click on the image for larger view):

the image above is the partition layout of my HDD, a 80 GB HDD. It has 6 partitions each created for different purpose with it's own size, most likely it's different with your HDD partition layout. Basically HDD can be divided to 4 primary partitions (3 primary partitions and 1 extended partition) and 15 logical partitions, the easiest way is to divide HDD in 2 primary partitions (1 primary and 1 extended) and inside the extended partition you can define up to 15 logical partitions. No matter how many partitions you have you'll only need 15 GB of unpartitioned space (as described in Elementary's specs requirement) but I'm running fine with 10 GB for / (root) partition and 700 MB for swap partition. If you don't have any unpartitioned left on your HDD, this is what happen in most cases, you'll need to resize your disk to create the unpartitioned space for Jupiter.
Step 1: Resizing Your HDD
You can use your desired partition management programs (Partition Magic, Acronis Disk Director, etc.) or use the already included with Jupiter: GParted. Before you continue backup your important data and if you feel you need to also backup your other OS (you can use CloneZilla, Norton Ghost, Acronis Disk Imaging, etc) to another disk, I don't need to tell you again what I've already wrote in the DISCLAIMER in my first post. You also need to make sure that during creating and or resizing partition the process in not interrupted in any way, data loss may occur when the process is interrupted. Usually this caused by power outage, so make sure you have a stable power source by using UPS or if you're using notebook the battery is sufficiently charged. Last but not least, if you have more than 1 disks connected to your computer you may disconnect them.

To start GParted click System > Administration > GParted Partition Editor

and welcome to GParted! Whoa! What's that /dev/sda and numbers mean? /dev is the directory (also called "folder") entry for devices in Linux. This is where Linux store devices files or special files which act as as an interface for device drivers and because in Linux everything treated as a file you'll find many files inside the /dev directory. Click here for more information on device files, we might talk more about it later but for now we'll focus on disks and partitions. In Linux disks information stored as /dev/sdxy, x are letters and y are numbers. /dev/sda means the first disk detected by BIOS, this can grow more to b, c, d, and so on depending on how many disks connected to your computer. And for the y (numbers) means the number of partitions on the disk, 1 is for primary partition, 4 is for extended partition, while 5 and above are logical partitions. /dev/sda1 means the the first partition of the first disk, /dev/sda4 is the extended partition and /dev/sda5 and above means logical partition inside the extended partition. You also see /dev/sda2 and /dev/sda3 on the picture above, the partition layout of my HDD, and in the future you'll also see /dev/sdb, /dev/sdc and so on.

If my HDD layout is complicated the above picture should be more simple, I'm using my 8 GB flash disk. It's not as large as HDD but basically the same, the only difference is the size. On the picture above there are 4 partitions: 1 primary partition, 1 extended partition with 2 logical partitions in it. Now let's get back to GParted and continue on resizing your HDD.

Click on any partition you wish to shrink, you can use any partition as long as the partition have empty space with the size enough for Jupiter, and then click "Resize/Move". When you're done resizing click on the empty space, create 1 partition with 1 GB size (for swap partition) and add another new partition with 10 GB size (for / partition). Click on the "Apply" button (the button with check mark icon) and wait for GParted to finish it's job. Close GParted when it's done, and let's continue with installing Jupiter. Note on swap partition: ideally the swap size is 3 times the size of you computer's memory (RAM) but I've never had any problem using 1 GB or less for swap partition. Last but not least: do not configure your swap partition too small since Jupiter need the partition to store hibernate image file, lack of space in swap partition will disable your computer to hibernate.
Step 2: Installing Jupiter

Find the install icon on the dock, it's located on the first icon on the left.

Select your desired language and click "Forward" to continue, I'm using english.

What you see on your display might be different, no need to worry if you don't see any check mark. You can connect to the internet and select the "Download updates while installing" but in order to speed up the install process, especially for those who don't have a high speed connection, it is best to update your system later. If you don't need any support for MP3 or decide to configure it later you can leave the "Install this third-party software" unchecked, click "Forward" to continue.
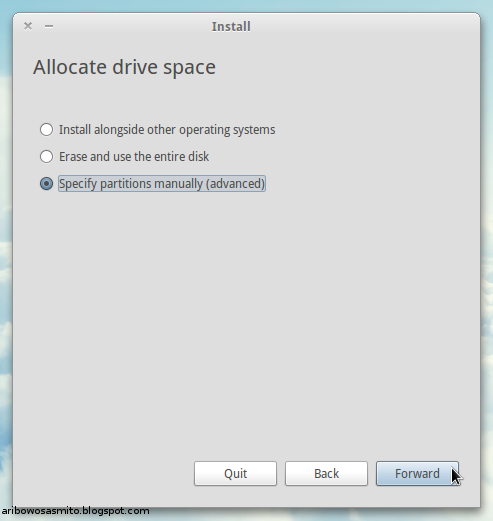
Select "Specify partitions manually (advanced)", click "Forward" to continue. Wait for the disk utility to finish loading, and when it's done...

click on the 10 GB partition you previously created, and then click "Add".

select "Ext4 journaling file system" on the "Use as:", check the "Format the partition" check box, select "/" on the "Mount point:" selection and then click "OK"

select the second partition you previously created for swap, and then click "Change".

Select "swap area" on the "Use as:". You can't choose "Format the partition" and assign a mount point for a swap partition, so just click "OK"

Check again your partition layout, especially on the check marks on "Format?" because it's the list of partitions that will be formatted during install, check mark means will be formatted. Don't change the boot loader device configuration, we'll discuss it later. When you're done click on "Install Now".

The install process will continue on copying files, during this stage you'll need to answer several question to configure your system. First is time zone configuration, click on the input box to search for your location by typing it and since my time zone is Jakarta I choose Jakarta. Click "Forward" when you're done.

Define your keyboard layout, in the example I choose USA. Click "Forward" when you're done.

Define yourself to your system. You can enter you full name in "Your name", for "Your computer's name" you can't use space and symbols, this also applied to "Pick a user name" (the easy way is to just enter your first name). Define your password in "Choose a password" entry and repeat your password in "Confirm your password" entry. You may choose to log in automatically when your system start or enter it manually, you can also Encrypt your home folder by choosing the "Encrypt my home folder". Be careful on doing this because there are no back doors on encryption, if you forget your password there will be no way to retrieve the files you stored in your home directory. Since I prefer to protect my system by using BIOS password I set my system to login automatically. Click "Forward" when you're done.

That's all you need to configure, wait for the system to finish installing. You'll see similar progress bar like above picture displaying different messages, and when it's done...

you may choose to stay using Jupiter's live system by clicking "Continue Testing" or restart your system by clicking "Restart Now". When you've restart your system you will be presented with boot menu, by default it'll highlight Jupiter. You can press enter to continue or wait for the countdown to finish. Like the live system Jupiter will display flashing "e" icon during boot and when it's done you'll see the interface similar to the live system. Congratulations, your system is installed!


